 back |
 home |
 next |
Actual Printing
Finally, after performing the page setup as indicated, all that's left is to print it out. To make sure your work looks its best, set the printer outputs at a resolution of 600 DPI or higher. Anything less will make the dots rough-looking, and the lack of anti-aliasing on the picture will become a bit more evident. Also, don't let your printer perform interpolation, or you may end up with unwanted artifacts in your print-out. Oddly, the more coarse the dot screen is, the better is the fidelity to the tone. Finer screens (those above 60 lines-per-inch, or so) turn darker and may evidence some banding.
If the printer is properly set, print your graphic out on the smoothest surfaced paper you can find. That sort of paper is best to preserve crisp lines and even tones, which means reproduction or copies of your print-out won't look too bad. However, keep in mind the fewer "generations" between your print-out and the final copy, the better.
Alternate Method of Screen Production For Reducing File Size for Transmission

(no larger version)
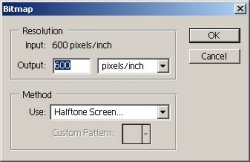
The other method you can use to make dot screens (especially if you have to reduce file size to save or transmit) is to go to Image => Mode and select "Bitmap" from the top selection pull down. You will get a pop-up window titled Bitmap. In the first window, select the maximum resolution of your Printer (in this example, 600 dots per inch), then make sure the second window says pixels/inch. In the bottom window select Halftone Screen from the options. You will be presented with a new window.

(no larger version)
In the new window, entitled Halftone Screen, enter the values as you would have when adjusting the printer screens above. My recommendations are Shape: Round, Angle: 45 Degrees, and Frequency for somewhere between 30 and 60 lines per inch. When the operation is complete, save a copy of this file as a TIFF. Check the box for LZW Compressions, and for the OS of the computer you are sending the document to. The file size should be very small and easily transferable.
A word of warning! At no time should you attempt to resize or rescale the image after turning the mode to bitmap -- it will cause the image to dramatically degrade and distort. I don't recommended trying to resize the image even in the grayscale size, as it will blur the areas between the tones and cause the image to smudge and look out of focus. If you must resize, do so right after scanning and before you add tones or turn it into a grayscale image.
Conclusion
Also, these techniques enable you to duplicate -- in many cases surpass -- the now-unavailable old adhesive plastic dot screens. Work can be toned like this quite a bit faster than the time it used to take to affix the old screens with a knife and burnisher.
The next page contains the finalized images various screen densities, labeled so you can make good screen choices.
Scott A. H. Ruggels
First printed: September 1 1998
Updated for the web: April 10 2004
| this tutorial | ||||
 back |
 home |
 next |
||
| Tutorials | ||||
 back |
 Home Page |
 next |
||
